Page 43 - CITS - ED - Mechanical
P. 43
ENGINEERING DRAWING - CITS


           EXERCISE 4 : Projection


           Orthographic projection


           Graphics are preferred by engineer's and craftsman to communicate their ideas.  When graphics are used for
           communication it is called graphical language.  Those who donot have the knowledge of this language are pro-
           fessionally illiterate.
           The saying that "A picture is worth a thousand words" is very much relevant in technical work.

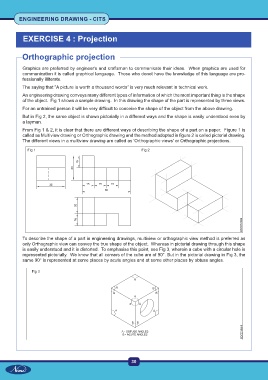
           An engineering drawing conveys many different types of information of which the most important thing is the shape
           of the object.  Fig 1 shows a sample drawing.  In this drawing the shape of the part is represented by three views.
           For an untrained person it will be very difficult to conceive the shape of the object from the above drawing.
           But in Fig 2, the same object is shown pictorially in a different ways and the shape is easily understood even by
           a layman.
           From Fig 1 & 2, it is clear that there are different ways of describing the shape of a part on a paper.  Figure 1 is
           called as Multiview drawing or Orthographic drawing and the method adopted in figure 2 is called pictorial drawing.
           The different views in a multiview drawing are called as 'Orthographic views' or Orthographic projections.

             Fig 1                                              Fig 2


           To describe the shape of a part in engineering drawings, multiview or orthographic view method is preferred as
           only Orthographic view can convey the true shape of the object.  Whereas in pictorial drawing through this shape
           is easily understood and it is distorted.  To emphasise this point, see Fig 3, wherein a cube with a circular hole is
           represented pictorially.  We know that all corners of the cube are of 90°. But in the pictorial drawing in Fig 3, the
           same 90° is represented at some places by acute angles and at some other places by obtuse angles.

               Fig 3


                                                           30

