Page 44 - CITS - ED - Mechanical
P. 44
ENGINEERING DRAWING - CITS


           Projection: Projection is commonly used term in draughtsmans vocabulary.  In the context of engineering draw-
           ing, projectors means image and it is comparable to the image formed on the retina of the eyes. (Projection can
           also be compared to the image of the object on the screen, where the film is projected (by the cinema projector)
           by the light rays.
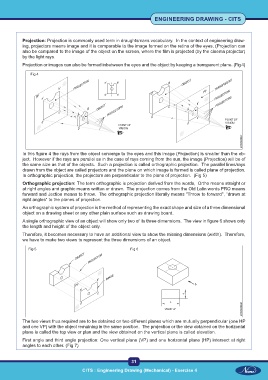
           Projection or images can also be formed inbetween the eyes and the object by keeping a transparent plane. (Fig 4)

               Fig 4


           In this figure 4 the rays from the object converge to the eyes and this image (Projection) is smaller than the ob-
           ject.  However if the rays are parallel as in the case of rays coming from the sun, the image (Projection) will be of
           the same size as that of the objects.  Such a projection is called orthographic projection.  The parallel lines/rays
           drawn from the object are called projectors and the plane on which image is formed is called plane of projection.
           In orthographic projection, the projectors are perpendicular to the plane of projection.  (Fig 5)
           Orthographic projection: The term orthographic is projection derived from the words,  Ortho means straight or
           at right angles and graphic means written or drawn.  The projection comes from the Old Latin words PRO means
           forward and Jection means to throw.  The orthographic projection literally means "Throw to forward", "drawn at
           right angles" to the planes of projection.

           An orthographic system of projection is the method of representing the exact shape and size of a three dimensional
           object on a drawing sheet or any other plain surface such as drawing board.
           A single orthographic view of an object will show only two of its three dimensions.  The view in figure 6 shows only
           the length and height of the object only.
           Therefore, it becomes necessary to have an additional view to show the missing dimensions (width).  Therefore,
           we have to make two views to represent the three dimensions of an object.
              Fig 5                                        Fig 6


           The two views thus required are to be obtained on two different planes which are mutually perpendicular (one HP
           and one VP) with the object remaining in the same position.  The projection or the view obtained on the horizontal
           plane is called the top view or plan and the view obtained on the vertical plane is called elevation.
           First angle and third angle projection: One vertical plane (VP) and one horizontal plane (HP) intersect at right
           angles to each other. (Fig 7)


                                                           31

                                      CITS : Engineering Drawing (Mechanical) - Exercise 4

