Page 49 - CITS - ED - Mechanical
P. 49
ENGINEERING DRAWING - CITS


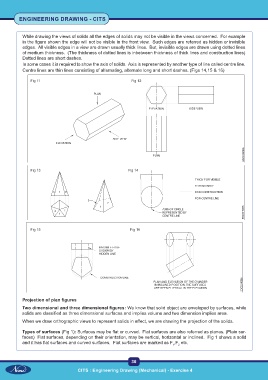
           While drawing the views of solids all the edges of solids may not be visible in the views concerned.  For example
           in the figure shown the edge will not be visible in the front view.  Such edges are referred as hidden or invisible
           edges.  All visible edges in a view are drawn usually thick lines.  But, invisible edges are drawn using dotted lines
           of medium thickness.  (The thickness of dotted lines is inbetween thickness of thick lines and construction lines)
           Dotted lines are short dashes.
           In some cases it is required to show the axis of solids.  Axis is represented by another type of line called centre line.
           Centre lines are thin lines consisting of alternating, alternate long and short dashes. (Figs 14,15 & 16)

               Fig 11                                      Fig 12


               Fig 13                                     Fig 14


               Fig 15                                      Fig 16


           Projection of plan figures
           Two dimensional and three dimensional figures: We know that solid object are enveloped by surfaces, while
           solids are classified as three dimensional surfaces and implies volume and two dimension implies area.
           When we draw orthographic views to represent solids in effect, we are drawing the projection of the solids.

           Types of surfaces (Fig 1): Surfaces may be flat or curved.  Flat surfaces are also referred as planes. (Plain sur-
           faces)  Flat surfaces, depending on their orientation, may be vertical, horizontal or inclined.  Fig 1 shows a solid
           and it has flat surfaces and curved surfaces.  Flat surfaces are marked as F ,F  etc.
                                                                              1  2


                                                           36

                                    CITS : Engineering Drawing (Mechanical) - Exercise 4

