Page 50 - CITS - ED - Mechanical
P. 50
ENGINEERING DRAWING - CITS


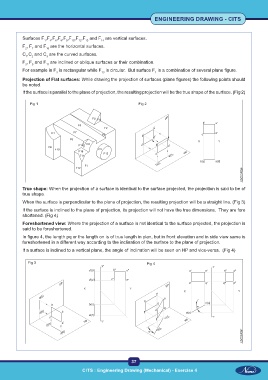
           Surfaces F ,F ,F ,F ,F ,F ,F ,F  and F  are vertical surfaces.
                            8
                              9
                                 10
                     1
                       4
                          6
                                              14
                                       13
                                    12
           F , F  and F  are the horizontal surfaces.
                      15
            2
               7
           C ,C  and C  are the curved surfaces.
            1  2      3
           F , F  and F  are inclined or oblique surfaces or their combination.
                      11
               5
            3
           For example in F  is rectangular while F  is circular.  But surface F  is a combination of several plane figure.
                          3
                                                                      1
                                              13
           Projection of Flat surfaces: While drawing the projection of surfaces (plane figures) the following points should
           be noted.
           If the surface is parallel to the plane of projection, the resulting projection will be the true shape of the surface. (Fig 2)
              Fig 1                                            Fig 2


           True shape: When the projection of a surface is identical to the surface projected, the projection is said to be of
           true shape.
           When the surface is perpendicular to the plane of projection, the resulting projection will be a straight line. (Fig 3)
           If the surface is inclined to the plane of projection, its projection will not have the true dimensions.  They are fore
           shortened. (Fig 4)
           Foreshortened view: Where the projection of a surface is not identical to the surface projected, the projection is
           said to be foreshortened.

           In figure 4, the length pq or the length on is of true length in plan, but in front elevation and in side view same is
           foreshortened in a different way according to the inclination of the surface to the plane of projection.
           If a surface is inclined to a vertical plane, the angle of inclination will be seen on HP and vice-versa.  (Fig 4)


             Fig 3                                                Fig 4


                                                           37

 CITS : Engineering Drawing (Mechanical) - Exercise 4  CITS : Engineering Drawing (Mechanical) - Exercise 4

