Page 52 - CITS - ED - Mechanical
P. 52
ENGINEERING DRAWING - CITS


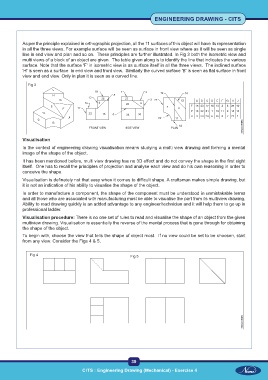
           As per the principle explained in orthographic projection, all the 11 surfaces of this object will have its representation
           in all the three views. For example surface will be seen as surface in front view where as it will be seen as single
           line in end view and plan and so on.  These principles are further illustrated. In Fig 3 both the isometric view and
           multi views of a block of an object are given.  The table given along is to identify the line that indicates the various
           surface. Note that the surface 'F' in isometric view is as surface itself in all the three views.  The inclined surface
           'H' is seen as a surface  in end view and front view.  Similarly the curved surface 'B' is seen as flat surface in front
           view and end view. Only in plan it is seen as a curved line.

             Fig 3


           Visualisation
           In the context of engineering drawing visualisation means studying a multi view drawing and forming a mental
           image of the shape of the object.
           It has been mentioned before, multi view drawing has no 3D effect and do not convey the shape in the first sight
           itself.  One has to recall the principles of projection and analyse each view and do his own reasoning in order to
           conceive the shape.
           Visualisation is definately not that easy when it comes to difficult shape. A craftsman makes simple drawing, but
           it is not an indication of his ability to visualise the shape of the object.

           In order to manufacture a component, the shape of the component must be understood in unmistakable terms
           and all those who are associated with manufacturing must be able to visualise the part from its multiview drawing.
           Ability to read drawing quickly is an added advantage to any engineer/technician and it will help them to go up in
           professional ladder.
           Visualisation procedure: There is no one set of rules to read and visualise the shape of an object from the given
           multiview drawing. Visualisation is essentially the reverse of the mental process that is gone through for obtaining
           the shape of the object.
           To begin with, choose the view that tells the shape of object most.  If no view could be set to be choosen, start
           from any view. Consider the Figs 4 & 5.


              Fig 4                                        Fig 5


                                                           39

 CITS : Engineering Drawing (Mechanical) - Exercise 4  CITS : Engineering Drawing (Mechanical) - Exercise 4

