Page 53 - CITS - ED - Mechanical
P. 53
ENGINEERING DRAWING - CITS


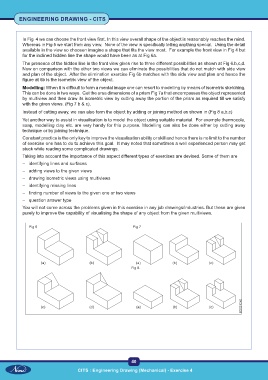
           In Fig  4 we can choose the front view first. In this view overall shape of the object is reasonably reaches the mind.
           Whereas in Fig 5 we start from any view.  None of the view is specifically telling anything special.  Using the detail
           available in the view so choosen imagine a shape that fits the view most.  For example the front view in Fig 4 but
           for the inclined hidden line the shape would have been as at Fig 6a.

           The presence of the hidden line in the front view gives rise to three different possibilities as shown at Fig 6.b,c,d.
           Now on comparison with the other two views we can eliminate the possibilities that do not match with side view
           and plan of the object.  After the elimination exercise Fig 6b matches with the side view and plan and hence the
           figure at 6b is the isometric view of the object.
           Modelling: When it is difficult to form a mental image one can resort to modelling by means of isometric sketching.
           This can be done in two ways.  Get the area dimensions of a prism Fig 7a that encompasses the object represented
           by multiview and then draw its isometric view by cutting away the portion of the prism as required till we satisfy
           with the given views. (Fig 7 b & c).
           Instead of cutting away, we can also form the object by adding or joining method as shown in (Fig 8 a,b,c)
           Yet another way to assist in visualisation is to model the object using suitable material.  For example thermocole,
           soap, modelling clay etc. are very handy for this purpose. Modelling can also be done either by cutting away
           technique or by joining technique.
           Constant practice is the only key to improve the visualisation ability or skill and hence there is no limit to the number
           of exercise one has to do to achieve this goal.  It may noted that sometimes a well experienced person may get
           stuck while reading some complicated drawings.
           Taking into account the importance of this aspect different types of exercises are devised. Some of them are
           –  identifying lines and surfaces
           –  adding views to the given views
           –  drawing isometric views using multiviews
           –  identifying missing lines
           –  finding number of views to the given one or two views
           –  question answer type

           You will not come across the problems given in this exercise in any job drawings/industries. But these are given
           purely to improve the capability of visualising the shape of any object from the given multiviews.


              Fig 6                                         Fig 7


                                                           Fig 8


                                                           40

                                    CITS : Engineering Drawing (Mechanical) - Exercise 4

