Page 57 - CITS - ED - Mechanical
P. 57
ENGINEERING DRAWING - CITS


              Fig 5


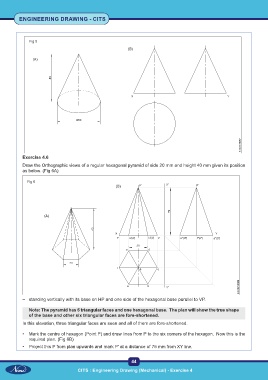
           Exercise 4.6
           Draw the Orthographic views of a regular hexagonal pyramid of side 20 mm and height 40 mm given its position
           as below. (Fig 6A)


             Fig 6


           –  standing vertically with its base on HP and one side of the hexagonal base parallel to VP.

              Note: The pyramid has 6 triangular faces and one hexagonal base.  The plan will show the true shape
              of the base and other six triangular faces are fore-shortened.

           In this elevation, three triangular faces are seen and all of them are fore-shortened.

           •  Mark the centre of hexagon (Point P) and draw lines from P to the six corners of the hexagon.  Now this is the
              required plan. (Fig 6B)
           •  Project this P from plan upwards and mark P' at a distance of 75 mm from XY line.


                                                           44

                                    CITS : Engineering Drawing (Mechanical) - Exercise 4

