Page 59 - CITS - ED - Mechanical
P. 59
ENGINEERING DRAWING - CITS


             Fig 8


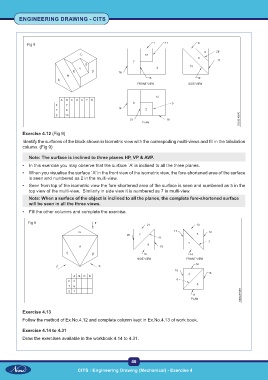
           Exercise 4.12 (Fig 9)
           Identify the surfaces of the block shown in Isometric view with the correspoding multi-views and fill in the tabulation
           column. (Fig 9)

              Note: The surface is inclined to three planes HP, VP & AVP.
           •  In this exercise you may observe that the surface `A' is inclined to all the three planes.
           •  When you visualise the surface `A' in the front view of the isometric view, the fore-shortened area of the surface
              is seen and numbered as 2 in the multi-view.
           •  Seen from top of the isometric view the fore-shortened area of the surface is seen and numbered as 5 in the
              top view of the multi-view.  Similarly in side view it is numbered as 7 in multi-view.
              Note: When a surface of the object is inclined to all the planes, the complete fore-shortened surface
              will be seen in all the three views.
           •  Fill the other columns and complete the exercise.

             Fig 9


           Exercise 4.13
           Follow the method of Ex.No.4.12 and complete column kept in Ex.No.4.13 of work book.

           Exercise 4.14 to 4.31
           Draw the exercises available in the workbook 4.14 to 4.31.


                                                           46

                                    CITS : Engineering Drawing (Mechanical) - Exercise 4

