Page 60 - CITS - ED - Mechanical
P. 60
ENGINEERING DRAWING - CITS


           Exercise 4.14
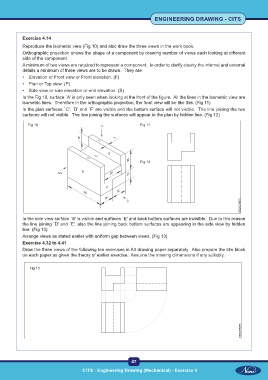
           Reproduce the isometric view (Fig 10) and also draw the three views in the work book.
           Orthographic projection shows the shape of a component by drawing number of views each looking at different
           side of the component.
           A minimum of two views are required to represent a component.  In order to clarify clearly the internal and external
           details a minimum of three views are to be drawn.  They are:
           •  Elevation or Front view or Front elevation. (F)
           •  Plan or Top view. (P)
           •  Side view or side elevation or end elevation. (S)
           In the Fig 10, surface `A' is only seen when looking at the front of the figure.  All the lines in the isometric view are
           isometric lines.  Therefore in the orthographic projection, the front view will be like this. (Fig 11)
           In the plan surfaces `C', `D' and `F' are visible and the bottom surface will not visible.  The line joining the two
           surfaces will not visible.  The line joining the surfaces will appear in the plan by hidden line. (Fig 12)

             Fig 10                                            Fig 11


                                                               Fig 12


           In the side view surface `B' is visible and surfaces `E' and back bottom surfaces are invisible.  Due to this reason
           the line joining `D' and `E', also the line joining back bottom surfaces are appearing in the side view by hidden
           line. (Fig 13)
           Arrange views as stated earlier with uniform gap between views. (Fig 13)
           Exercise 4.32 to 4.41
           Draw the three views of the following ten exercises in A3 drawing paper separately.  Also prepare the title block
           on each paper as given the theory of earlier exercise.  Assume the missing dimensions if any suitably.


              Fig 13


                                                           47

 CITS : Engineering Drawing (Mechanical) - Exercise 4  CITS : Engineering Drawing (Mechanical) - Exercise 4

