Page 55 - CITS - ED - Mechanical
P. 55
ENGINEERING DRAWING - CITS


              Fig 2


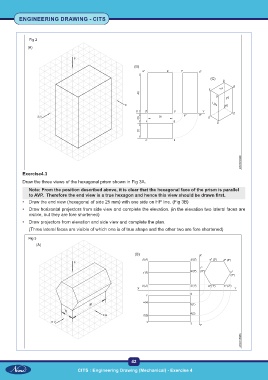
           Exercise4.3

           Draw the three views of the hexagonal prism shown in Fig 3A.
              Note: From the position described above, it is clear that the hexagonal face of the prism is parallel
              to AVP.  Therefore the end view is a true hexagon and hence this view should be drawn first.
           •  Draw the end view (hexagonal of side 25 mm) with one side on HP line. (Fig 3B)
           •  Draw horizontal projectors from side view and complete the elevation. (in the elevation two lateral faces are
              visible, but they are fore shortened)

           •  Draw projectors from elevation and side view and complete the plan.
              (Three lateral faces are visible of which one is of true shape and the other two are fore shortened)
              Fig 3


                                                           42

                                    CITS : Engineering Drawing (Mechanical) - Exercise 4

