Page 58 - CITS - ED - Mechanical
P. 58
ENGINEERING DRAWING - CITS


           •  Mark the points f', a'b'c' etc... on XY line by projecting the corresponding points from plan.
           •  Join the P' with f', a',b',c' etc and complete the required elevation.
           •  Draw projectors from elevation and plan to complete the required side view.
           Exercise 4.7
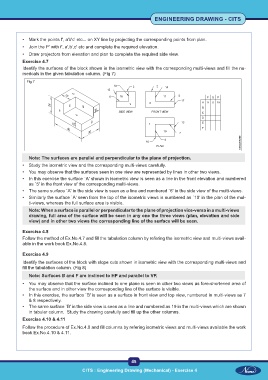
           Identify the surfaces of the block shown in the isometric view with the corresponding multi-views and fill the nu-
           mericals in the given tabulation column. (Fig 7)
             Fig 7


              Note: The surfaces are parallel and perpendicular to the plane of projection.
           •  Study the isometric view and the corresponding multi-views carefully.
           •  You may observe that the surfaces seen in one view are represented by lines in other two views.
           •  In this exercise the surface `A' shown in isometric view is seen as a line in the front elevation and numbered
              as `5' in the front view of the corresponding multi-views.
           •  The same surface `A' in the side view is seen as a line and numbered `6' in the side view of the multi-views.
           •  Similarly the surface `A' seen from the top of the isometric views is numbered as `10' in the plan of the mul-
              ti-views, whereas the full surface area is visible.
              Note: When a surface is parallel or perpendicular to the plane of projection vice-versa in a multi-views
              drawing, full area of the surface will be seen in any one the three views (plan, elevation and side
              view) and in other two views the corresponding line of the surface will be seen.

           Exercise 4.8
           Follow the method of Ex.No.4.7 and fill the tabulation column by refering the isometric view and multi-views avail-
           able in the work book Ex.No.4.8.

           Exercise 4.9
           Identify the surfaces of the block with slope cuts shown in isometric view with the corresponding multi-views and
           fill the tabulation column. (Fig 8)
              Note: Surfaces B and F are inclined to HP and parallel to VP.

           •  You may observe that the surface inclined to one plane is seen in other two views as fore-shortened area of
              the surface and in other view the corresponding line of the surface is visible.
           •  In this exercise, the surface `B' is seen as a surface in front view and top view, numbered in multi-views as 7
              & 8 respectively.
           •  The same surface `B' in the side view is seen as a line and numbered as 19 in the multi-views which are shown
              in tabular column.  Study the drawing carefully and fill up the other columns.
           Exercise 4.10 & 4.11
           Follow the procedure of Ex.No.4.9 and fill columns by refering isometric views and multi-views available the work
           book Ex.No.4.10 & 4.11.


                                                           45

 CITS : Engineering Drawing (Mechanical) - Exercise 4  CITS : Engineering Drawing (Mechanical) - Exercise 4

