Page 54 - CITS - ED - Mechanical
P. 54
ENGINEERING DRAWING - CITS


          Orthographic projection

           Procedure

           Exercise 4.1
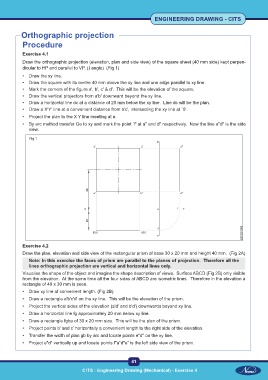
           Draw the orthographic projection (elevation, plan and side view) of the square sheet (40 mm side) kept perpen-
           dicular to HP and parallel to VP. (I angle)  (Fig 1)
           •  Draw the xy line.
           •  Draw the square with its centre 40 mm above the xy line and one edge parallel to xy line.
           •  Mark the corners of the figure a', b', c' & d'.  This will be the elevation of the square.
           •  Draw the vertical projectors from a'b' downward beyond the xy line.
           •  Draw a horizontal line dc at a distance of 20 mm below the xy line.  Line dc will be the plan.
           •  Draw a X'Y' line at a convenient distance from b'c', intersecting the xy line at `0'.
           •  Project the plan to the X Y line meeting at e.

           •  By arc method transfer Oe to xy and mark the point `f' at a" and d" respectively.  Now the line a"d" is the side
              view.

              Fig 1


           Exercise 4.2
           Draw the plan, elevation and side view of the rectangular prism of base 30 x 20 mm and height 40 mm.  (Fig 2A)
              Note: In this exercise the faces of prism are parallel to the planes of projection.  Therefore all the
              lines orthographic projection are vertical and horizontal lines only.
           Visualise the shape of the object and imagine the shape description of views.  Surface ABCD (Fig 2B) only visible
           from the elevation.  At the same time all the four sides of ABCD are isometric lines.  Therefore in the elevation a
           rectangle of 40 x 30 mm is seen.
           •  Draw xy line of convenient length. (Fig 2B)
           •  Draw a rectangle a'b'c'd' on the xy line.  This will be the elevation of the prism.
           •  Project the vertical sides of the elevation (a'd' and b'd') downwards beyond xy line.
           •  Draw a horizontal line fg approximately 20 mm below xy line.
           •  Draw a rectangle fgba of 30 x 20 mm size.  This will be the plan of the prism.
           •  Project points b' and c' horizontally a convenient length to the right side of the elevation.
           •  Transfer the width of plan gb by arc and locate points e"d" on the xy line.
           •  Project e"d" vertically up and locate points f"a"d"e" is the left side view of the prism.


                                                           41

 CITS : Engineering Drawing (Mechanical) - Exercise 4  CITS : Engineering Drawing (Mechanical) - Exercise 4

