Page 51 - CITS - ED - Mechanical
P. 51
ENGINEERING DRAWING - CITS


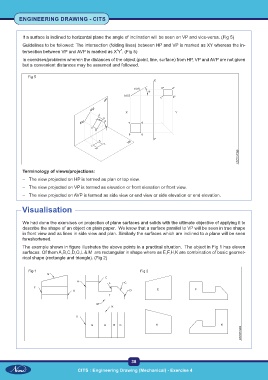
           If a surface is inclined to horizontal plane the angle of inclination will be seen on VP and vice-versa. (Fig 5)

           Guidelines to be followed: The intersection (folding lines) between HP and VP is marked as XY whereas the in-
           tersection between VP and AVP is marked as X'Y'. (Fig 5)

           In exercises/problems wherein the distances of the object (point, line, surface) from HP, VP and AVP are not given
           but a convenient distances may be assumed and followed.


             Fig 5


           Terminology of views/projections:
           –  The view projected on HP is termed as plan or top view.
           –  The view projected on VP is termed as elevation or front elevation or front view.
           –  The view projected on AVP is termed as side view or end view or side elevation or end elevation.

           Visualisation


           We had done the exercises on projection of plane surfaces and solids with the ultimate objective of applying it to
           describe the shape of an object on plain paper.  We know that a surface parallel to VP will be seen in true shape
           in front view and as lines in side view and plan. Similarly the surfaces which are inclined to a plane will be seen
           foreshortened.

           The example shown in figure illustrates the above points in a practical situation.  The object in Fig 1 has eleven
           surfaces. Of them A,B,C,D,G,L & M  are rectangular in shape where as E,F,H,K are combination of basic geomet-
           rical shape (rectangle and triangle). (Fig 2)


              Fig 1                                            Fig 2


                                                           38

                                    CITS : Engineering Drawing (Mechanical) - Exercise 4

