Page 56 - CITS - ED - Mechanical
P. 56
ENGINEERING DRAWING - CITS


           Exercise 4.4
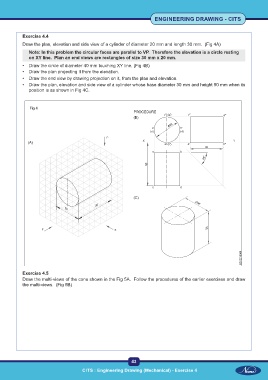
           Draw the plan, elevation and side view of a cylinder of diameter 20 mm and length 30 mm.  (Fig 4A)

              Note: In this problem the circular faces are parallel to VP.  Therefore the elevation is a circle resting
              on XY line.  Plan an end views are rectangles of size 30 mm x 20 mm.
           •  Draw the circle of diameter 40 mm touching XY line. (Fig 4B)
           •  Draw the plan projecting it from the elevation.
           •  Draw the end view by drawing projection on it, from the plan and elevation.
           •  Draw the plan, elevation and side view of a cylinder whose base diameter 30 mm and height 50 mm when its
              position is as shown in Fig 4C.


              Fig 4


           Exercise 4.5
           Draw the multi-views of the cone shown in the Fig 5A.  Follow the procedures of the earlier exercises and draw
           the multi-views.  (Fig 5B)


                                                           43

 CITS : Engineering Drawing (Mechanical) - Exercise 4  CITS : Engineering Drawing (Mechanical) - Exercise 4

