Page 45 - CITS - ED - Mechanical
P. 45
ENGINEERING DRAWING - CITS


           All the four quadrants have one HP and one VP formation.  As per convention in mathematics, the quadrants are
           numbered as 1 , 2 , 3  and 4 .  These four quadrants are called four dihedral angles, namely 1  angle, 2  angle,
                           nd
                        st
                                                                                                       nd
                               rd
                                     th
                                                                                              st
           3  angle and 4  angle.
            rd
                        th
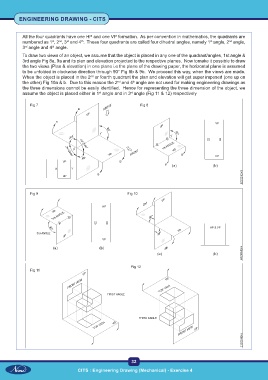
           To draw two views of an object, we assume that the object is placed in any one of the quadrant/angles, 1st angle &
           3rd angle Fig 8a, 9a and its plan and elevation projected to the respective planes.  Now tomake it possible to draw
           the two views (Plan & elevation) in one plane i.e the plane of the drawing paper, the horizontal plane is assumed
           to be unfolded in clockwise direction through 90° Fig 8b & 9b.  We proceed this way, when the views are made.
           When the object is placed in the 2  or fourth quadrant the plan and elevation will get super imposed (one up on
                                         nd
           the other) Fig 10a & b.  Due to this reason the 2  and 4 angle are not used for making engineering drawings as
                                                     nd
                                                            th
           the three dimensions cannot be easily identified.  Hence for representing the three dimension of the object, we
           assume the object is placed either in 1  angle and in 3 angle (Fig 11 & 12) respectively
                                             st
                                                           rd
              Fig 7                                            Fig 8


              Fig 9                                       Fig 10


                                                           Fig 12
              Fig 11


                                                           32

                                    CITS : Engineering Drawing (Mechanical) - Exercise 4

