Page 41 - CITS - ED - Mechanical
P. 41
ENGINEERING DRAWING - CITS


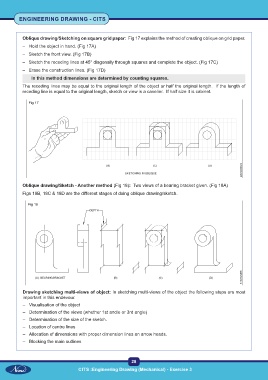
           Oblique drawing/Sketching on square grid paper:  Fig 17 explains the method of creating oblique on grid paper.
           –  Hold the object in hand. (Fig 17A)
           –  Sketch the front view. (Fig 17B)
           –  Sketch the receding lines at 45° diagonally through squares and complete the object. (Fig 17C)
           –  Erase the construction lines. (Fig 17D)

               In this method dimensions are determined by counting squares.
           The receding lines may be equal to the original length of the object or half the original length.  If the length of
           receding line is equal to the original length, sketch or view is a cavelier.  If half size it is cabinet.


              Fig 17


           Oblique drawing/Sketch - Another method (Fig 18):  Two views of a bearing bracket given. (Fig 18A)

           Figs 18B, 18C & 18D are the different stages of doing oblique drawing/sketch.

             Fig 18


           Drawing sketching multi-views of object: In sketching multi-views of the object the following steps are most
           important in this endevour.
           –  Visualisation of the object
           –  Determination of the views (whether 1st andle or 3rd angle)
           –  Determination of the size of the sketch.
           –  Location of centre lines
           –  Allocation of dimensions with proper dimension lines an arrow heads.
           –  Blocking the main outlines


                                                           28
                                    CITS :Engineering Drawing (Mechanical) - Exercise 3

