Page 66 - CITS - ED - Mechanical
P. 66
ENGINEERING DRAWING - CITS


           Pictorial projection


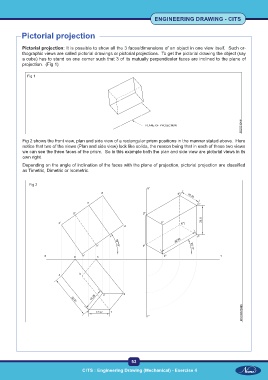
           Pictorial projection: It is possible to show all the 3 faces/dimensions of an object in one view itself.  Such or-
           thographic views are called pictorial drawings or pictorial projections.  To get the pictorial drawing the object (say
           a cube) has to stand on one corner such that 3 of its mutually perpendicular faces are inclined to the plane of
           projection.  (Fig 1)

             Fig 1


           Fig 2 shows the front view, plan and side view of a rectangular prism positions in the manner stated above.  Here
           notice that two of the views (Plan and side view) lock like solids, the reason being that in each of these two views
           we can see the three faces of the prism.  So in this example both the plan and side view are pictorial views in its
           own right.
           Depending on the angle of inclination of the faces with the plane of projection, pictorial projection are classified
           as Timetric, Dimetric or Isometric.


              Fig 2


                                                           53

 CITS : Engineering Drawing (Mechanical) - Exercise 4  CITS : Engineering Drawing (Mechanical) - Exercise 4

