Page 68 - CITS - ED - Mechanical
P. 68
ENGINEERING DRAWING - CITS


           way is complicated and time consuming.  Therefore, simpler method have been deviced to make pictorial drawing
           that are identical isometric projection and these methods are discussed below.

              Fig 5                                       Fig 6


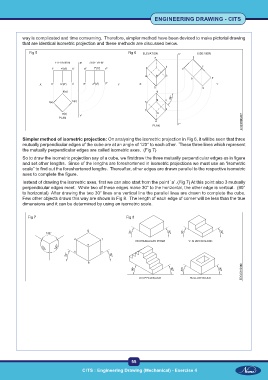
           Simpler method of isometric projection: On analysing the isometric projection in Fig 6, it will be seen that three
           mutually perpendicular edges of the cube are at an angle of 120° to each other.  These three lines which represent
           the mutually perpendicular edges are called isometric axes.  (Fig 7)
           So to draw the isometric projection say of a cube, we firstdraw the three mutually perpendicular edges as in figure
           and set other lengths.  Since of the lengths are foreshortened in isometric projections we must use an “isometric
           scale” to find out the foreshortened lengths.  Thereafter, other edges are drawn parallel to the respective isometric
           axes to complete the figure.

           Instead of drawing the isometric axes, first we can also start from the point `a’ .(Fig 7) At this point also 3 mutually
           perpendicular edges meet.  While two of these edges make 30° to the horizontal, the other edge is vertical.  (90°
           to horizontal)  After drawing the two 30° lines one vertical line the parallel lines are drawn to complete the cube.
           Few other objects drawn this way are shown in Fig 8.  The length of each edge of corner will be less than the true
           dimensions and it can be determined by using an isometric scale.

             Fig 7                                       Fig 8


                                                           55

 CITS : Engineering Drawing (Mechanical) - Exercise 4  CITS : Engineering Drawing (Mechanical) - Exercise 4

