Page 69 - CITS - ED - Mechanical
P. 69
ENGINEERING DRAWING - CITS


           Isometric scale


           Isometric scales are used to get the foreshortened lengths required for isometric projection.

           Before constructing an isometric scale, you must understand is the relationship between the true length of an edge
           and the length of the same in isometric projection.
           To determine the relationship between the true length and corresponding length in isometric projection, proceed
           as follows:
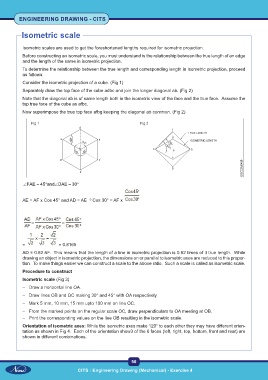
           Consider the isometric projection of a cube. (Fig 1)
           Separately draw the top face of the cube adbc and join the longer diagonal ab. (Fig 2)
           Note that the diagonal ab is of same length both in the isometric view of the face and the true face.  Assume the
           top true face of the cube as afbc.
           Now superimpose the true top face afbg keeping the diagonal ab common. (Fig 2)

               Fig 1                                           Fig 2


             FAE    45  and  DAE   30


           AE = AF x Cos 45° and AD = AE  Cos 30° = AF x


           =                = 0.8165
           AD = 0.82 AF.  This means that the length of a line in isometric projection is 0.82 times of it true length.  While
           drawing an object in isometric projection, the dimensions on or parallel to isometric axes are reduced to this propor-
           tion.  To make things easier we can construct a scale to the above ratio.  Such a scale is called as isometric scale.
           Procedure to construct
           Isometric scale (Fig 3)

           –  Draw a horizontal line OA.
           –  Draw lines OB and OC making 30° and 45° with OA respectively.
           –  Mark 5 mm, 10 mm, 15 mm upto 100 mm on line OC.
           –  From the marked points on the regular scale OC, draw perpendiculars to OA meeting at OB.
           –  Print the corresponding values on the line OB resulting in the isometric scale.
           Orientation of isometric axes: While the isometric axes make 120° to each other they may have different orien-
           tation as shown in Fig 4.  Each of the orientation show3 of the 6 faces (left, right, top, bottom, front and rear) are
           shown in different combinations.


                                                           56

                                    CITS : Engineering Drawing (Mechanical) - Exercise 4

