Page 74 - CITS - ED - Mechanical
P. 74
ENGINEERING DRAWING - CITS


           EXERCISE 5 : Isometric Views


           Pictorial drawing (Isometric drawing)


           Pictorial drawing: Even a common man can understand easily the shape of an object quickly by a picture or by
           a pictorial drawing.  It is also called as three dimensional drawing.
           Pictorial drawings are very useful for describing the shape of a piece part or component, even though they have
           a distorted look.
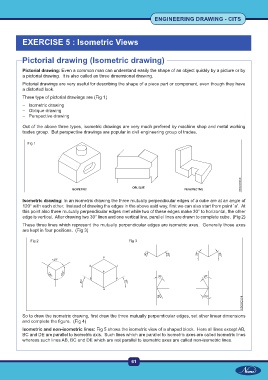
           Three type of pictorial drawings are (Fig 1)
           –  Isometric drawing
           –  Oblique drawing
           –  Perspective drawing

           Out of the above three types, isometric drawings are very much prefered by machine shop and metal working
           trades group.  But perspective drawings are popular in civil engineering group of trades.

             Fig 1


           Isometric drawing: In an isometric drawing the three mutually perpendicular edges of a cube are at an angle of
           120° with each other.  Instead of drawing the edges in the above said way, first we can also start from point `a'.  At
           this point also three mutually perpendicular edges met while two of these edges make 30° to horizontal, the other
           edge is vertical.  After drawing two 30° lines and one vertical line, parallel lines are drawn to complete cube.  (Fig 2)
           These three lines which represent the mutually perpendicular edges are isometric axes.  Generally those axes
           are kept in four positions.  (Fig 3)

               Fig 2                                      Fig 3


           So to draw the isometric drawing, first draw the three mutually perpendicular edges, set other linear dimensions
           and complete the figure.  (Fig 4)
           Isometric and non-isometric lines: Fig 5 shows the isometric view of a shaped block.  Here all lines except AB,
           BC and DE are parallel to isometric axis.  Such lines which are parallel to isometric axes are called isometric lines
           whereas such lines AB, BC and DE which are not parallel to isometric axes are called non-isometric lines.


                                                           61

