Page 70 - CITS - ED - Mechanical
P. 70
ENGINEERING DRAWING - CITS


              Fig 3                                          Fig 4


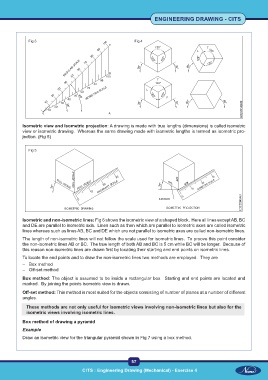
           Isometric view and Isometric projection: A drawing is made with true lengths (dimensions) is called isometric
           view or isometric drawing.  Whereas the same drawing made with isometric lengths is termed as isometric pro-
           jection. (Fig 5)


              Fig 5


           Isometric and non-isometric lines: Fig 6 shows the isometric view of a shaped block.  Here all lines except AB, BC
           and DE are parallel to isometric axis.  Lines such as then which are parallel to isometric axes are called isometric
           lines whereas such as lines AB, BC and DE which are not parallel to isometric axes are called non-isometric lines.
           The length of non-isometric lines will not follow the scale used for isometric lines.  To proove this point consider
           the non-isometric lines AB or BC.  The true length of both AB and BC is 5 cm while BC will be longer.  Because of
           this reason non-isometric lines are drawn first by locating their starting and end points on isometric lines.
           To locate the end points and to draw the non-isometric lines two methods are employed.  They are
           –  Box method
           –  Off-set method
           Box method: The object is assumed to be inside a rectangular box.  Starting and end points are located and
           marked.  By joining the points isometric view is drawn.
           Off-set method: This method is most suited for the objects consisting of number of planes at a number of different
           angles.
             These methods are not only useful for isometric views involving non-isometric lines but also for the
             isometric views involving isometric lines.
           Box method of drawing a pyramid
           Example

           Draw an isometric view for the triangular pyramid shown in Fig 7 using a box method.


                                                           57

 CITS : Engineering Drawing (Mechanical) - Exercise 4  CITS : Engineering Drawing (Mechanical) - Exercise 4

