Page 67 - CITS - ED - Mechanical
P. 67
ENGINEERING DRAWING - CITS


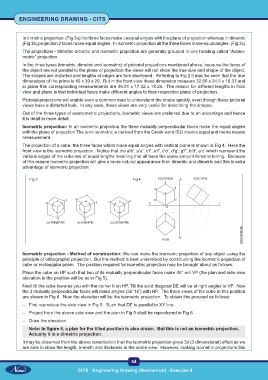
           In trimetric projection  (Fig 3a) the three faces make unequal angles with the plane of projection whereas in dimetric
           (Fig 3b) projection 2 faces make equal angles.  In isometric projection all the three faces make equal angles. (Fig 3c)
           The projections - trimetric dimetric and isometric projection are generally grouped in one heading called “Axano-
           metric” projection.
           In the three types (trimetric, dimetric and isometric) of pictorial projections mentioned above, because the faces of
           the object are not parallel to the plane of projection the views will not show the true size and shape of the object.
           The shapes are distorted and lengths of edges are fore shortened.  Referring to Fig 2 it may be seen that the true
           dimensions of the prims is 40 x 30 x 20.  But in the front view these dimension measure 32.66 x 24.5 x 16.33 and
           in plane this corresponding measurements are 36.51 x 17.32 x 18.26.  The reason for different lengths in front
           view and plane is that individual faces make different angles to their respective plane of projection.

           Pictorial projections will enable even a common man to understand the shape quickly, even though these pictorial
           views have a distorted look.  In any case, these views are very useful for describing the shapes.
           Out of the three types of axanometric projections, isometric views are preferred due to an advantage and hence
           it is dealt in more detail.
           Isometric projection: In an isometric projection the three mutually perpendicular faces make the equal angles
           with the plane of projection The term isometric is derived from the Greek word ISO means equal and metra means
           measurement.
           The projection of a cube, the three faces which make equal angles with vertical plane is shown in Fig 4.  Here the
           front view is the isometric projection.  Notice that the a’b’, a’e’, c’f’, e’f’, c’d’, d’g’, g’f’, b’d’, a’c’ which represent the
           various edges of the cube are of equal lengths meaning that all have the same amount foreshortening.  Because
           of this reason isometric projection will give a more natural appearance than trimetric and dimetric and this is extra
           advantage of isometric projection.


              Fig 3                                         Fig 4


           Isometric projection - Method of construction: We can make the isometric projection of any object using the
           principle of orthographic projection.  But the method is best understood by constructing the isometric projection of
           cube or rectangular prism.  The position required for isometric projection may be brought about as follows.

           Place the cube on HP such that two of its mutually perpendicular faces make 45° will VP (the plan and side view
           elevation in the position will be as in Fig 5).
           Next tilt the cube towares you with the corner b on HP. Tilt the solid diagonal DE will be at right angles to VP.  Now
           the 3 mutually perpendicular faces will make angles (35°16’) with HP.  The three views of the cube in this position
           are shown in Fig 6.  Now the elevation will be the isometric projection.  To obtain this proceed as follows:

           –  First reproduce the side view in Fig 5.  Such that DE is parallel to XY line.
           –  Project from the above side view and the plan in Fig 5 shall be reproduced in Fig 6.
           –  Draw the elevation
              Note: In figure 6, a plan for the tilted position is also drawn.  But this is not an isometric projection.
              Actually it is a dimetric projection.
           It may be observed from the above construction that the isometric projection gives 3d (3 dimensional) effect as we
           are able to show the length, breadth and thickness in the same view.  However, making isometric projections this


                                                           54

                                    CITS : Engineering Drawing (Mechanical) - Exercise 4

