Page 71 - CITS - ED - Mechanical
P. 71
ENGINEERING DRAWING - CITS


                                                             Fig 7
              Fig 6


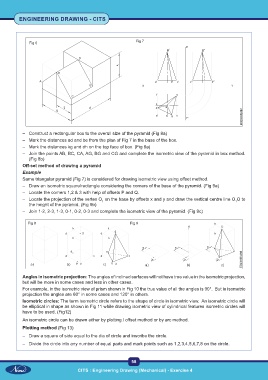
           –  Construct a rectangular box to the overall size of the pyramid (Fig 8a)
           –  Mark the distances ad and be from the plan of Fig 7 in the base of the box.
           –  Mark the distances kg and dh on the top face of box. (Fig 8a)
           –  Join the points AB, BC, CA, AG, BG and CG and complete the isometric view of the pyramid in box method.
              (Fig 8b)
           Off-set method of drawing a pyramid
           Example
           Same triangular pyramid (Fig 7) is considered for drawing isometric view using offset method.
           –  Draw an isometric square/rectangle considering the corners of the base of the pyramid. (Fig 9a)
           –  Locate the corners 1,2 & 3 with help of offsets P and Q.
           –  Locate the projection of the vertex O  on the base by offsets x and y and draw the vertical centre line O O to
                                              1
                                                                                                          1
              the height of the pyramid. (Fig 9b)
           –  Join 1-2, 2-3, 1-3, 0-1, 0-2, 0-3 and complete the isometric view of the pyramid. (Fig 9c)

             Fig 8                                         Fig 9


           Angles in isometric projection: The angles of inclined surfaces will not have true value in the isometric projection,
           but will be more in some cases and less in other cases.
           For example, in the isometric view of prism shown in Fig 10 the true value of all the angles is 90°.  But in isometric
           projection the angles are 60° in some cases and 120° in others.
           Isometric circles: The term isometric circle refers to the shape of circle in isometric view.  An isometric circle will
           be elliptical in shape as shown in Fig 11 while drawing isometric view of cylindrical features isometric circles will
           have to be used. (Fig12)
           An isometric circle can be drawn either by plotting / offset method or by arc method.
           Plotting method (Fig 13)
           –  Draw a square of side equal to the dia of circle and inscribe the circle.
           –  Divide the circle into any number of equal parts and mark points such as 1,2,3,4,5,6,7,8 on the circle.


                                                           58

                                    CITS : Engineering Drawing (Mechanical) - Exercise 4

