Page 76 - CITS - ED - Mechanical
P. 76
ENGINEERING DRAWING - CITS


           Off-set method of drawing a pyramid
           Example
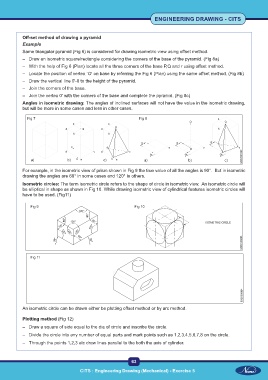
           Same triangular pyramid (Fig 6) is considered for drawing isometric view using offset method.

           –  Draw an isometric square/rectangle considering the corners of the base of the pyramid. (Fig 8a)
           –  With the help of Fig 6 (Plan) locate all the three corners of the base P,Q and r using offset method.
           –  Locate the position of vertex `O' on base by referring the Fig 6 (Plan) using the same offset method. (Fig 8b)
           –  Draw the vertical line 0'-0 to the height of the pyramid.
           –  Join the corners of the base.
           –  Join the vertex 0' with the corners of the base and complete the pyramid. (Fig 8c)
           Angles in isometric drawing: The angles of inclined surfaces will not have the value in the isometric drawing,
           but will be more in some cases and less in other cases.

             Fig 7                                             Fig 8


           For example, in the isometric view of prism shown in Fig 9 the true value of all the angles is 90°.  But in isometric
           drawing the angles are 60° in some cases and 120° in others.
           Isometric circles: The term isometric circle refers to the shape of circle in isometric view.  An isometric circle will
           be elliptical in shape as shown in Fig 10. While drawing isometric view of cylindrical features isometric circles will
           have to be used. (Fig11)

               Fig 9                                         Fig 10


               Fig 11


           An isometric circle can be drawn either be plotting offset method or by arc method.

           Plotting method (Fig 12)

           –  Draw a square of side equal to the dia of circle and inscribe the circle.
           –  Divide the circle into any number of equal parts and mark points such as 1,2,3,4,5,6,7,8 on the circle.
           –  Through the points 1,2,3 etc draw lines parallel to the both the axis of cylinder.


                                                           63

                                     CITS : Engineering Drawing (Mechanical) - Exercise 5

