Page 81 - CITS - ED - Mechanical
P. 81
ENGINEERING DRAWING - CITS


           Pictorial drawing (Isometric drawing)


           Draw the isometric figures


           Procedure


           Exercise 5.1
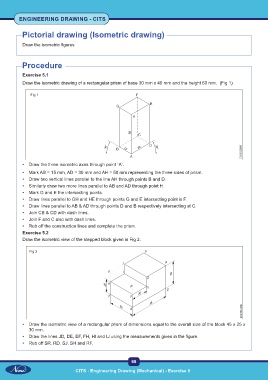
           Draw the isometric drawing of a rectangular prism of base 30 mm x 40 mm and the height 60 mm.  (Fig 1)


               Fig 1


           •  Draw the three isometric axes through point `A'.
           •  Mark AB = 15 mm, AD = 30 mm and AH = 50 mm representing the three sides of prism.
           •  Draw two vertical lines parallel to the line AH through points B and D.
           •  Similarly draw two more lines parallel to AB and AD through point H.
           •  Mark G and E the intersecting points.
           •  Draw lines parallel to GH and HE through points G and E intersecting point is F.
           •  Draw lines parallel to AB & AD through points D and B respectively intersecting at C.
           •  Join CB & CD with dash lines.
           •  Join F and C also with dash lines.
           •  Rub off the construction lines and complete the prism.
           Exercise 5.2
           Draw the isometric view of the stepped block given in Fig 2.


              Fig 2


           •  Draw the isometric view of a rectangular prism of dimensions equal to the overall size of the block 45 x 25 x
              30 mm.
           •  Draw the lines JD, DE, EF, FH, HI and IJ using the measurements given in the figure.
           •  Rub off SR, RD, SJ, SH and RF.


                                                           68

                                   CITS : Engineering Drawing (Mechanical) - Exercise 5

