Page 86 - CITS - ED - Mechanical
P. 86
ENGINEERING DRAWING - CITS


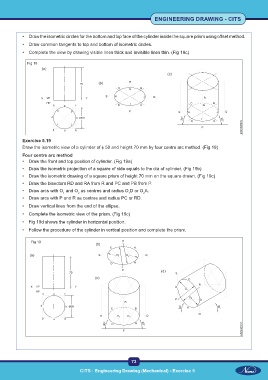
           •  Draw the isometric circles for the bottom and top face of the cylinder inside the square prism using offset method.
           •  Draw common tangents to top and bottom of isometric circles.

           •  Complete the view by drawing visible lines thick and invisible lines thin. (Fig 18c)

             Fig 18


           Exercise 5.19
           Draw the isometric view of a cylinder of φ 50 and height 70 mm by four centre arc method. (Fig 19)
           Four centre arc method
           •  Draw the front and top position of cylinder. (Fig 19a)
           •  Draw the isometric projection of a square of side equals to the dia of cylinder. (Fig 19b)
           •  Draw the isometric drawing of a square prism of height 70 mm on the square drawn. (Fig 19c)
           •  Draw the bisectors RD and RA from R and PC and PB from P.
           •  Draw arcs with O  and O  as centres and radius O D or O A.
                                    2
                             1
                                                                 2
                                                          1
           •  Draw arcs with P and R as centres and radius PC or RD.
           •  Draw vertical lines from the end of the ellipse.
           •  Complete the isometric view of the prism. (Fig 19c)
           •  Fig 19d shows the cylinder in horizontal position.
           •  Follow the procedure of the cylinder in vertical position and complete the prism.

               Fig 19


                                                           73

                                     CITS : Engineering Drawing (Mechanical) - Exercise 5

