Page 87 - CITS - ED - Mechanical
P. 87
ENGINEERING DRAWING - CITS


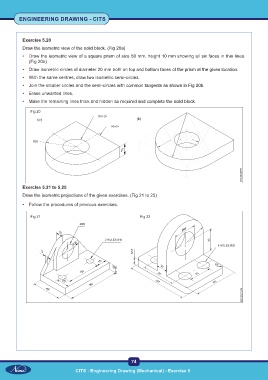
           Exercise 5.20
           Draw the isometric view of the solid block. (Fig 20a)

           •  Draw the isometric view of a square prism of size 50 mm, height 10 mm showing all six faces in thin lines.
              (Fig 20b)
           •  Draw isometric circles of diameter 20 mm both on top and bottom faces of the prism at the given location.

           •  With the same centres, draw two isometric semi-circles.
           •  Join the smaller circles and the semi-circles with common tangents as shown in Fig 20b.
           •  Erase unwanted lines.
           •  Make the remaining lines thick and hidden as required and complete the solid block.

               Fig 20


           Exercise 5.21 to 5.25
           Draw the isometric projections of the given exercises. (Fig 21 to 25)

           •  Follow the procedures of previous exercises.

               Fig 21                                          Fig 22


                                                           74

                                   CITS : Engineering Drawing (Mechanical) - Exercise 5

