Page 83 - CITS - ED - Mechanical
P. 83
ENGINEERING DRAWING - CITS


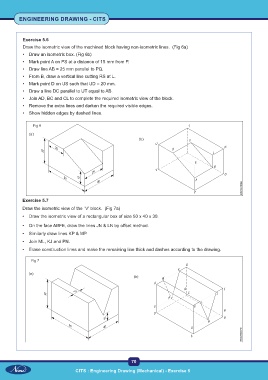
           Exercise 5.6
           Draw the isometric view of the machined block having non-isometric lines.  (Fig 6a)
           •  Draw an isometric box. (Fig 6b)
           •  Mark point A on PS at a distance of 15 mm from P.
           •  Draw line AB = 25 mm parallel to PQ.
           •  From B, draw a vertical line cutting RS at L.
           •  Mark point D on US such that UD = 20 mm.
           •  Draw a line DC parallel to UT equal to AB.
           •  Join AD, BC and CL to complete the required isometric view of the block.
           •  Remove the extra lines and darken the required visible edges.
           •  Show hidden edges by dashed lines.


                Fig 6


           Exercise 5.7
           Draw the isometric view of the `V' block.  (Fig 7a)
           •  Draw the isometric view of a rectangular box of size 50 x 40 x 30.

           •  On the face ABFE, draw the lines JN & LN by offset method.
           •  Similarly draw lines KP & MP.
           •  Join ML, KJ and PN.
           •  Erase construction lines and make the remaining line thick and dashes according to the drawing.


               Fig 7


                                                           70

                                   CITS : Engineering Drawing (Mechanical) - Exercise 5

