Page 78 - CITS - ED - Mechanical
P. 78
ENGINEERING DRAWING - CITS


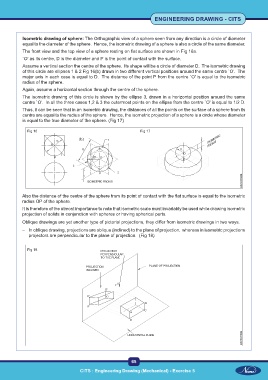
           Isometric drawing of sphere: The Orthographic view of a sphere seen from any direction is a circle of diameter
           equal to the diameter of the sphere.  Hence, the isometric drawing of a sphere is also a circle of the same diameter.
           The front view and the top view of a sphere resting on flat surface are shown in Fig 16a.
           `O' as its centre, D is the diameter and P is the point of contact with the surface.
           Assume a vertical section the centre of the sphere.  Its shape will be a circle of diameter D.  The isometric drawing
           of this circle are ellipses 1 & 2 Fig 16(b) drawn in two different vertical positions around the same centre `O'.  The
           major axis in each case is equal to D.  The distance of the point P from the centre `O' is equal to the isometric
           radius of the sphere.
           Again, assume a horizontal section through the centre of the sphere.
           The isometric drawing of this circle is shown by the ellipse 3, drawn in a horizontal position around the same
           centre `O'.  In all the three cases 1,2 & 3 the outermost points on the ellipse from the centre `O' is equal to 1/2 D.
           Thus, it can be seen that in an isometric drawing, the distances of all the points on the surface of a sphere from its
           centre are equal to the radius of the sphere.  Hence, the isometric projection of a sphere is a circle whose diameter
           is equal to the true diameter of the sphere. (Fig 17)


             Fig 16                                            Fig 17


           Also the distance of the centre of the sphere from its point of contact with the flat surface is equal to the isometric
           radius OP of the sphere.
           It is therefore of the utmost importance to note that isometric scale must invariably be used while drawing isometric
           projection of solids in conjunction with spheres or having spherical parts.

           Oblique drawings are yet another type of pictorial projections, they differ from isometric drawings in two ways.
           –  In oblique drawing, projections are oblique (inclined) to the plane of projection.  whereas in isometric projections
              projectors are perpendicular to the plane of projection.  (Fig 18)


             Fig 18


                                                           65

                                     CITS : Engineering Drawing (Mechanical) - Exercise 5

