Page 80 - CITS - ED - Mechanical
P. 80
ENGINEERING DRAWING - CITS


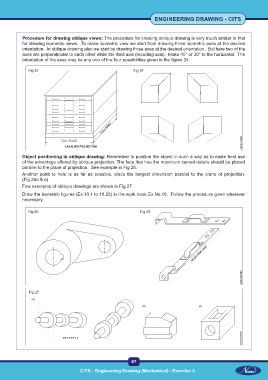
           Procedure for drawing oblique views: The procedure for creating oblique drawing is very much similar to that
           for drawing isometric views.  To make isometric view we start from drawing three isometric axes at the desired
           orientation.  In oblique drawing also we start by drawing three axes at the desired orientation.  But here two of the
           axes are perpendicular to each other while the third axis (receding axis).  Make 45° or 30° to the horizontal.  The
           orientation of the axes may be any one of the four possibilities given in the figure 24.

              Fig 23                                        Fig 24


           Object positioning in oblique drawing: Remember to position the object in such a way as to make best use
           of the advantage offered by oblique projection. The face that has the maximum curved details should be placed
           parallel to the plane of projection.  See example in Fig 25.
           Another  point  to  note  is  as  far  as  possible,  place  the  longest  dimension  parallel  to  the  plane  of  projection.
           (Fig 26a & b)
           Few examples of oblique drawings are shown in Fig 27.
           Draw the isometric figures (Ex.10.1 to 10.29) in the work book Ex.No.10.  Follow the procedure given wherever
           necessary.


              Fig 25                                           Fig 26


              Fig 27


                                                           67

                                     CITS : Engineering Drawing (Mechanical) - Exercise 5

