Page 82 - CITS - ED - Mechanical
P. 82
ENGINEERING DRAWING - CITS


           •  Darken the remaining lines of the stepped block.
           Exercise 5.3
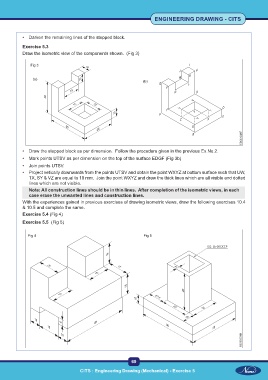
           Draw the isometric view of the components shown.  (Fig 3)

               Fig 3


           •  Draw the stepped block as per dimension.  Follow the procedure given in the previous Ex.No.2.
           •  Mark points UTSV as per dimension on the top of the surface EDGF (Fig 3b)
           •  Join points UTSV.
           •  Project vetically downwards from the points UTSV and obtain the point WXYZ at bottom surface such that UW,
              TX, SY & VZ are equal to 10 mm.  Join the point WXYZ and draw the thick lines which are all visible and dotted
              lines which are not visible.
              Note: All construction lines should be in thin lines.  After completion of the isometric views, in each
              case erase the unwanted lines and construction lines.
           With the experiences gained in previous exercises of drawing isometric views, draw the following exercises 10.4
           & 10.5 and complete the same.
           Exercise 5.4 (Fig 4)

           Exercise 5.5  (Fig 5)

             Fig 4                                               Fig 5


                                                           69

                                     CITS : Engineering Drawing (Mechanical) - Exercise 5

