Page 77 - CITS - ED - Mechanical
P. 77
ENGINEERING DRAWING - CITS


             Fig 12


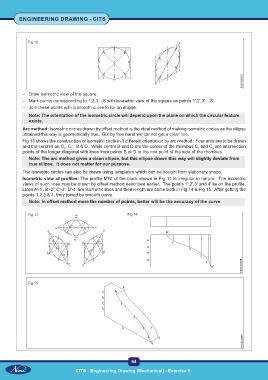
           –  Draw isometric view of the square.
           –  Mark points corresponding to 1,2,3....8 with isometric view of the square as points 1',2',3'....8'.
           –  Join these points with a smooth curve to for an ellipse.
              Note: The orientation of the isometric circle will depend upon the plane on which the circular feature
              exists.
           Arc method: Isometric circles drawn by offset method is the ideal method of making isometric circles as the ellipse
           obtained this way is geometrically true.  But by free hand we cannot get a clear line.
           Fig 13 shows the construction of isometric circle in 3 different orientation by arc method.  Four arcs are to be drawn
           and the centres an C , C ,  B & D.  While centre B and D are the corner of the rhombus C  and C  are intersection
                                                                                               2
                                                                                         1
                             1
                                 2
           points of the longer diagonal with lines from points B or D to the mid point of the side of the rhombus.
              Note: The arc method gives a clean ellipse, but this ellipse drawn this way will slightly deviate from
              true ellipse.  It does not matter for our purpose.
           The isometric circles can also be drawn using templates which can be bought from stationary shops.
           Isometric view of profiles: The profile M'N' of the block shown in Fig 14 is irregular in nature.  The isometric
           views of such lines may be drawn by offset method described earlier.  The points 1',2',3' and 4' lie on the profile.
           Lines A'-1', B'-2', C'-3', D'-4' are isometric lines and their length are same both in Fig 14 & Fig 15.  After getting the
           points 1,2,3 & 4, they joined by smooth curve.
              Note: In offset method more the number of points, better will be the accuracy of the curve.


             Fig 13                                       Fig 14


             Fig 15


                                                           64

                                   CITS : Engineering Drawing (Mechanical) - Exercise 5

